Proxy Access
Students can grant parents or others view-only access to select pages of their student records via the Proxy Management tab in Self-Service. They can also use the Proxy Management tab to provide consent for University officials to discuss all of their education records with a proxy. Click a link below for more information.
- Create a new proxy
- Edit proxy information or authorizations
- Change my proxy’s passphrase
- Reset my proxy’s password
- Grant access for my parent/proxy to view my billing information
- Authorize my parent/proxy to discuss my education records with University officials
- Delete an existing proxy
For the parent or other proxy:
- Log in to Proxy Access
- New proxy activation (How a new proxy activates their account)
- Reset my proxy password
- Update my name or proxy email address
For Students
Students can create a new proxy from Self-Service by following these steps:
- Click on the Proxy Management tab.
- Click on the Add New link in the upper right.
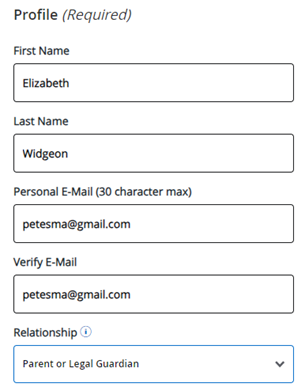
- Enter the Proxy information, including name, personal email address, and select a Relationship from the drop-down list.

- Be sure to enter a Passphrase, which can be a code, word, or group of words that you will share with your proxy. The passphrase will be used by your proxy to verify their identity with university officials over the phone.
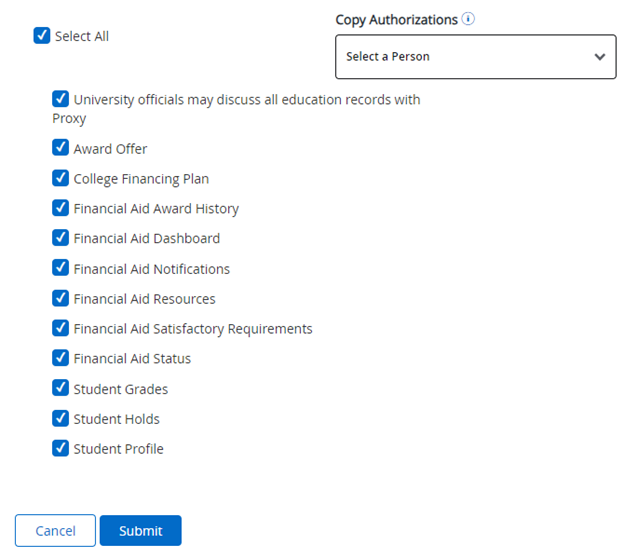
- Under the Authorizations section, check the boxes next to the items you wish to authorize for your proxy. Note that the first item in the list (University officials may discuss all education records …) is different from the others – learn more about authorizing your proxy to discuss student records with university officials. All other items in the authorizations list provide view-only access to specific pages within Self-Service.

- Click the Submit button at the bottom of the page to save your changes. You will be automatically returned to the main Proxy Management page and see a message indicating the proxy has been successfully created.
- Your proxy will receive an email message with information on how to activate their Proxy account. Until your proxy has followed the instructions in the email message and activated their account, they will display as inactive and you may see notices indicating their password is disabled or their email was not verified.
Edit proxy information or authorizations
- From Proxy Management, click the edit/pencil icon just below the proxy’s name.
- In addition to updating the proxy relationship type, access dates, passphrase and authorizations, you can also use the links provided to perform the following actions:
- Reset the proxy’s password (sends your proxy an email with instructions to reset their password)
- E-mail the proxy’s passphrase (sends your proxy an email containing the passphrase you’ve created; they will be required to provide the passphrase to verify their identity over the phone with university officials)
- E-mail authorizations (sends your proxy the list of items you’ve authorized for them)
- After making desired updates, click the Submit button at the bottom of the page.
The passphrase is something you create for your proxy. They use their passphrase to verify their identity over the phone with university officials.
- From Proxy Management, click the edit/pencil icon just below the proxy’s name.
- Update the Passphrase in the field provided, then click Submit at the bottom of the page to save your changes.
- Finally, click the Email Passphrase link.
- It is important for you to email the Passphrase to your proxy, as they can’t view it online.
If your proxy is having trouble logging into Proxy Access due to an unknown or expired password, you can help your proxy by using the Reset Password link where you edit proxy information. By following the steps below, an email will automatically be sent to your proxy with instructions on how to create a new proxy password.
- From Proxy Management, click the edit/pencil icon just below the proxy’s name.
- Click on the Reset Password link.
- This action sends your proxy an email with instructions on how to reset their proxy password.
How can I grant access for my parent/proxy to view my billing information?
Billing information is only available via the Touch Net Student Account Suite, and students can create Authorized User accounts within the Touch Net system to grant parents and others with access to view billing information and submit payments. Click here for information on creating Authorized Users. Please note that Proxy Access and Authorized User accounts are not connected in any way.
Authorize my parent/proxy to discuss my education records with University officials.
While the majority of the options on the proxy Authorizations list allow you to grant a parent/proxy view-only access to specific Self-Service pages, checking the first option (University officials may discuss all education records with proxy) authorizes your proxy to discuss any student educational records with University officials. It does NOT permit parents to request official documents, make changes to records, or otherwise conduct educational business on the student’s behalf. View more details here.
To permanently delete a proxy relationship, click the delete/trash icon below the proxy’s name from the Proxy Management page. You will be prompted to confirm you want to delete the selected proxy. Click Delete to proceed with the deletion, or Cancel to retain the proxy.
Active proxies can login to Proxy Access at any time using their proxy email address as their username and the proxy password they created. Proxies can only view Self-Service pages that have been authorized by the student.
Newly added proxies must first activate their proxy account by following instructions in a New proxy identity email they receive before they can login to Proxy Access.
New Proxy activation (How a new proxy activates their account)
When a student adds a new proxy, the proxy will receive an email (with a subject of New proxy identity) that contains information needed to activate the account and login to Proxy Access. New proxies can follow the steps below to activate their account:
- Click the Proxy Access link in the email and enter the Initial Password provided.
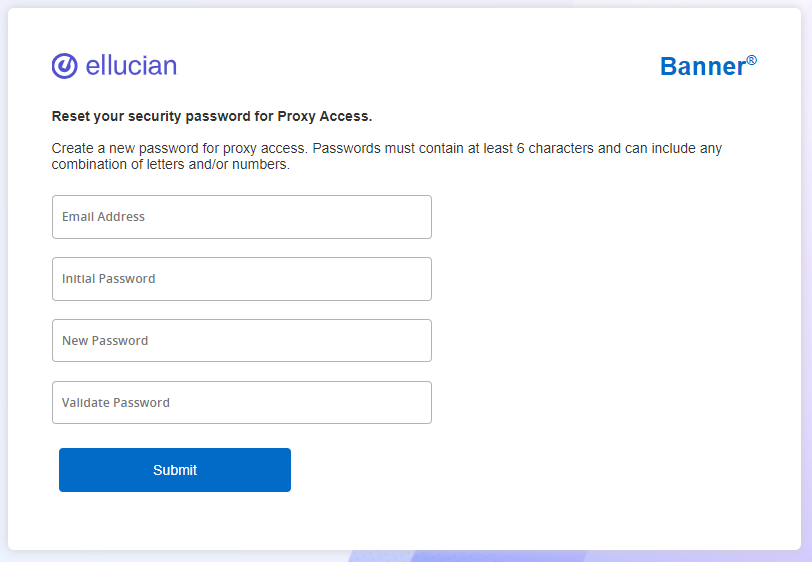
- Your browser will open to a page similar to the one below. Enter your proxy email address, the Initial Password, then enter a new password into the provided fields. Click Submit to save your new proxy password.

- Next you will be prompted to sign in using your proxy email address and new proxy password.
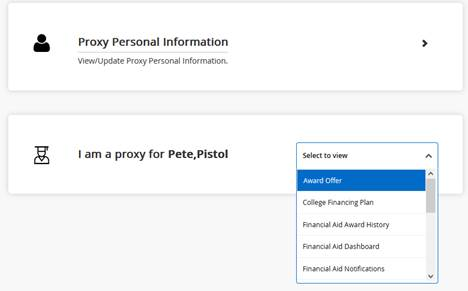
- The Proxy Access home page Includes a link for you to view and/or update your personal information, followed by a list of pages you’re authorized to view for your student.
- To view authorized pages, click with the drop-down arrow next to your student’s name. Here you will see the item(s) that have been authorized by your student for you to view. Click on any item to view. Use your browser back button to return to the proxy home page and select another item to view.

Proxies can reset their password by following the steps below.
- Go to the Proxy Access login page.
- Enter the email address associated with your Proxy account in the Username field, then click the Forgot Password link.
- You should receive an email with an Initial Password and a link to create a new password.
- Once logged into Proxy Access, you can change your password at any time by clicking the “Click here to change your password” link on your Proxy Personal Information page.
Update my name or proxy email address
- Log in to Proxy Access using your email address as the username and the proxy password you created.
- Click on Proxy Personal Information to view or update your details.
- After making the desired updates, click the Submit button.
- Please note that if you changed your email address, you will receive two email messages as outlined below and must take action to keep your proxy account active:
- An email will be sent to your new proxy email address asking you to confirm the new email. Follow the instructions in this message to proceed using the new email address as your proxy username.
- Another email will be sent to your old proxy email address providing an option to cancel changing your proxy email address. You can delete this message unless you truly wish to cancel the update and want to retain the old email address as your proxy username.
